How to Voice Over a PowerPoint Like a Pro

Adding a voice-over to your PowerPoint is pretty straightforward. You've got two main options: you can either record your audio directly onto each slide using PowerPoint's built-in 'Record' feature, or you can import pre-recorded audio files. Either way, you'll turn a simple slideshow into a self-running presentation, which is perfect for things like online courses or sending out a deck for your team to review on their own time.
Why a Great Voice Over Transforms Your Presentation

Speak4Me – A well-crafted voice over can turn a simple slide deck into a powerful, standalone presentation asset.
Before you jump in and hit the record button, it helps to think about why you're adding narration. It’s not just an extra feature; it’s a genuine strategic advantage. A well-done voice-over can elevate a standard set of slides into a seriously powerful communication tool.
Think of it this way: it’s the difference between handing someone a brochure and giving them a personal guided tour. The human voice creates a real connection, building trust and keeping your audience tuned in from the first slide to the last. This is especially important when you can't be there to present in person.
From Slideshow to Standalone Asset
When you add narration, your presentation becomes a versatile and reusable asset. It's no longer just a visual aid that needs you standing next to it to make sense. It can now work completely on its own in a bunch of different situations.
Just think about the possibilities:
Corporate Training: You can create consistent, on-demand training modules that new hires or team members can work through at their own pace.
Sales Pitches: Imagine sending a potential client a guided presentation that walks them through your value proposition perfectly, every single time.
Academic Lectures: Students get a resource they can go back to again and again to review complex topics, complete with your detailed explanations.
Product Demos: Walk users through your product’s features with clear, step-by-step instructions they can easily follow.
The Power of Consistent and Accessible Messaging
Adding a voice-over guarantees your message is delivered exactly as you intend it, every time. You don't have to worry about forgetting key points, and the tone stays consistent. For brand messaging or critical training, that level of control is invaluable.
A recorded narration also makes your content far more accessible. It supports different learning styles and assists people who might find it tough to read large blocks of text, making sure your message connects with a broader audience.
The good news is that modern tools have made this process incredibly simple. You don't need a professional recording studio to get clear, high-quality audio anymore. Whether you record your own voice or use an advanced tool to generate the narration, a polished presentation is well within reach. For instance, getting a handle on what text-to-speech is and how to use it can open up a world of possibilities for creating flawless audio in minutes.
Ready to create a voice-over that sounds professional without all the recording hassle? Download Speak4Me free on iOS and turn your script into crystal-clear narration for your next PowerPoint.
Crafting Your Script for a Natural Narration

Speak4Me – Writing a conversational script is the key to creating a natural-sounding voice over for your PowerPoint.
The secret to a great voice-over isn’t the mic—it’s the script. Have you ever tried to read a formal report out loud? It sounds clunky and unnatural. That's because text written for the eye just doesn't work for the ear.
To get that smooth, engaging narration for your PowerPoint, you have to write it like you speak. A good rule of thumb is to imagine you're explaining the slide to a coworker. You'd naturally use shorter sentences, simpler words, and contractions like "it's" or "you'll." This small shift in tone makes all the difference.
From Text on a Page to Spoken Words
The trick is to connect your script directly to what's happening on screen. I always go through my presentation slide by slide, writing down exactly what I want to say for each one. This simple method ensures your narration and visuals are perfectly in sync.
As you write, think about timing. Actually read your lines aloud. Does it feel rushed? Does it drag on? If you find yourself talking for too long on a single slide, that’s a red flag. It probably means the slide itself is overloaded with information.
Your script shouldn't just repeat what's on the slide. It's there to add context, provide deeper insight, or weave a narrative that the visuals support. It’s the story behind the bullet points.
As you polish your draft, remember that even a data-heavy presentation benefits from compelling storytelling. A clear narrative can make your message stick. If you need some inspiration, checking out a few voice over script examples can really help you find the right style.
Preparing Your Slides for Narration
Before hitting record, give your presentation a quick cleanup. A great script deserves a clean visual stage, and this prep work will save you from a world of technical pain down the road.
Your main goal here is to make sure the slides support your voice, not compete with it.
Simplify Animations: I’ve learned this the hard way. Overly complex animations can completely wreck your narration's timing. Stick with simple, quick options like "Appear" or "Fade" to keep the focus on your words.
Check Transitions: Make sure your slide transitions are snappy and consistent. A long, dramatic transition creates dead air in your audio, which can feel awkward for the listener.
Review Visuals: Does every single image and chart directly relate to what you're saying? If not, cut it. A clean, uncluttered slide is always more effective.
With your script tightened and your slides polished, you’re ready to bring it all together. And if you want to bypass the recording process entirely, a good text-to-speech tool can give you a perfect result every time. Download Speak4Me free on iOS and turn that script into a professional, natural-sounding voice-over in just a few minutes.
Recording Your Voice Directly in PowerPoint

Speak4Me – PowerPoint's built-in recording feature lets you narrate slides directly within the application.
One of the best things about PowerPoint is that it has a surprisingly solid set of built-in tools for recording audio. This means you can create a polished, narrated presentation without ever needing to jump to another application. It’s an all-in-one approach that gives you total control, letting you sync your voice perfectly with every slide and animation.
The feature you’ll be living in is "Record Slide Show," which you can find right under the "Record" tab. Before you hit that button, a quick pro tip: plug in an external microphone if you have one. Your laptop's built-in mic will get the job done, but a dedicated mic is a game-changer for capturing clean, rich audio.
Getting Your Recording Started
With your microphone ready, pop open your presentation and navigate to the "Record" tab. Clicking "Record" will launch a special recording interface that shows your current slide, your speaker notes, and a few simple controls at the top. It's a clean, focused environment designed for narration.
You can start recording from the very beginning or jump in at the current slide. As you start speaking, just click through your slides as if you were giving the presentation live. PowerPoint automatically captures all your timings, so your voice will sync up perfectly with each slide transition.
One of the coolest features here is the set of annotation tools at the bottom of the recording screen. You get a digital pen, a highlighter, and even a laser pointer. As you narrate, you can use these to draw, underline, or point to key information on the slide, and these visual cues get recorded right along with your audio. It's a great way to guide your audience's focus.
Tips for Capturing Clean Audio
You don't need a professional recording studio to get great sound, but where you record makes a massive difference. A few simple tweaks can elevate your audio from amateur to professional.
Find a Quiet Space: This is non-negotiable. Record in a room with as little background noise as possible. That means closing the windows, turning off fans or air conditioners, and avoiding rooms with a lot of echo, like kitchens or bathrooms.
Maintain a Consistent Pace: Try to speak clearly and at a natural, steady rhythm. If you rush through the script, your audience will have a hard time keeping up.
Do a Test Recording: Always, always do a quick test on one or two slides before committing to the full presentation. Play it back and listen for volume, clarity, and any weird background hums.
The biggest lifesaver when recording in PowerPoint is how easy it is to fix mistakes. If you stumble over a word or cough mid-sentence, you don't have to scrap everything and start over. Just go to that specific slide, clear the narration for it, and re-record only that section.
This kind of direct recording is becoming standard practice, especially as the demand for narrated content explodes. This just shows how critical clear, professional audio has become.
For more complex projects that might need more firepower than PowerPoint's built-in tools, you might want to look into something like Medialecture, a dedicated lecture capture solution. It offers more advanced features for recording and managing educational content.
And if you'd rather skip the recording process altogether, you can get perfect audio every time with a text-to-speech app. Download Speak4Me free on iOS to instantly turn your script into a professional-sounding voice-over.
Achieving Perfect Narration with Text-to-Speech
What if you could generate a flawless, studio-quality voice-over for your PowerPoint without ever touching a microphone? It's not science fiction; it's what modern text-to-speech (TTS) tools make possible. An app like Speak4Me lets you create professional narration that’s consistently clear and perfectly paced every single time.
This approach completely changes the game. Instead of stressing about background noise, stumbling over words, or dealing with uneven volume, you just need to focus on your script. It turns a performance task into a simple editing job, saving you a ton of time and guaranteeing a polished result that would otherwise require expensive equipment and endless retakes.
Generating Your Audio with Speak4Me
Getting started is surprisingly simple. You just paste your finished script directly into the Speak4Me app. From there, you get to play around with a wide variety of high-quality, AI-powered voices to find the perfect match for your presentation's tone.
Once you’ve picked a voice, the app does the heavy lifting and generates the audio file. The real magic, though, is how easy it is to make changes later.
Effortless Edits: Spot a typo or decide to rephrase a sentence? No need to re-record anything. Just tweak the text, and the audio updates automatically.
Perfect Pacing: TTS gives you a consistent delivery speed, so you don't have to worry about rushing through key points or dragging things out.
Multi-Language Support: If you're creating versions for an international audience, you can generate narrations in different languages with just a few clicks.
This method is catching on fast. The global voiceover software market was valued at around USD 167 million in 2025 and is on track to hit USD 227.4 million by 2033. This boom is largely thanks to AI-powered tools that let anyone produce high-quality audio for projects like PowerPoint presentations, no recording experience needed.
Voice Over Method Comparison
To help you decide what's best for your project, here’s a quick comparison between recording your own voice in PowerPoint and using a TTS app like Speak4Me.
Feature | Recording in PowerPoint | Using Speak4Me (TTS) |
|---|---|---|
Audio Quality | Dependent on mic quality, room acoustics, and your voice | Consistently clear, professional, studio-quality sound |
Ease of Editing | Requires re-recording entire sections for minor mistakes | Simple text edits instantly update the audio |
Consistency | Can vary in tone, pace, and volume across takes | Perfectly consistent pace and tone from start to finish |
Time Investment | Recording and re-recording can be very time-consuming | Extremely fast; generate audio in minutes |
Vocal Performance | Requires you to be a confident and clear speaker | No performance anxiety; the AI handles the delivery |
Language Options | Limited to languages you speak fluently | Access to a wide range of voices and languages |
Ultimately, while recording yourself offers a personal touch, using a TTS tool like Speak4Me provides unmatched consistency, quality, and efficiency, making it a fantastic option for professional presentations.
Importing Your Narration into PowerPoint
After you’ve exported your audio files from Speak4Me (I recommend saving separate MP3s for each slide), the final step is to bring them into your presentation. This is where you sync your perfectly generated audio with your visuals.
The image below gives you a clear look at the workflow for adding and syncing your pre-recorded audio files right inside PowerPoint.
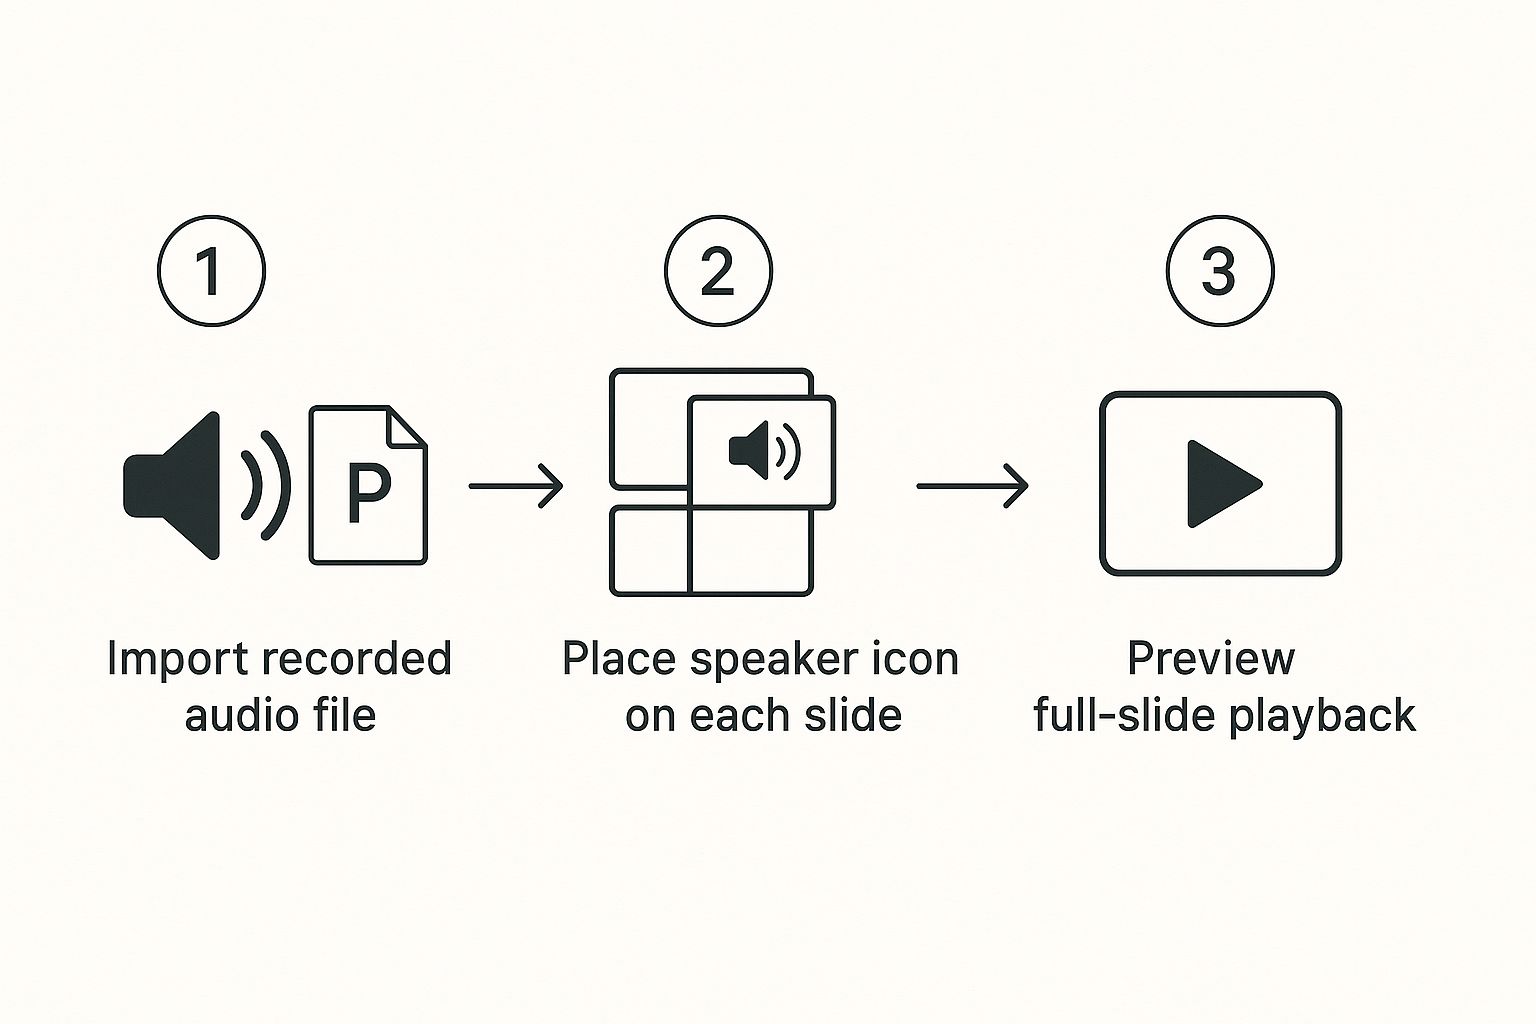
Speak4Me – Import your generated audio files slide-by-slide and set them to play automatically for a seamless presentation.
As you can see, the trick is to import each audio file to its matching slide. From there, you just need to adjust the playback settings to start automatically, which creates a smooth, hands-free experience for your audience.
By creating the audio outside of your presentation software, you gain a ton of flexibility. You can tweak the narration in Speak4Me as much as you want without ever opening PowerPoint, then just swap in the updated audio file when you're ready.
This approach gives you the best of both worlds: PowerPoint's powerful visual tools and the flawless audio from a dedicated TTS app. You can learn more about how to create incredibly natural sounding text-to-speech to take your audio quality even further.
Ready to turn your script into professional narration without the recording headaches? Download Speak4Me free on iOS and create your perfect PowerPoint voice-over today.
Alright, you’ve recorded your audio, synced everything up, and now your presentation is ready for the world. This final step—exporting and sharing—is where it all comes together. How you save the file can make all the difference between a seamless viewing experience and a technical headache for your audience.
We're going to look at the two best ways to package your narrated presentation: as a PowerPoint Show or as a video file. Picking the right one is crucial for making sure everyone sees and hears your work exactly as you planned.
What's the Best Way to Save Your File?
You have two main paths you can take here, and the best choice really depends on who your audience is and how you'll be sending it to them.
PowerPoint Show (.ppsx): Think of this as the "just press play" version of a PowerPoint file. When someone opens a
.ppsxfile, it jumps straight into full-screen presentation mode, bypassing the normal editing view. It's a clean, professional way to share directly with colleagues via email or a shared drive. The only catch? Your viewer needs to have PowerPoint (or a free viewer) installed.Video (MP4): This is easily the most versatile and bulletproof option. Exporting as an MP4 bundles everything—your audio, animations, and slide timings—into a single, self-contained video file. It’s the perfect format for uploading to a website, a learning management system (LMS), or video platforms like YouTube or Vimeo. Best of all, it works on any device, from a laptop to a smartphone, with no special software required.
Honestly, I export to MP4 about 99% of the time. It completely removes any "it didn't work on my computer" issues. No worries about missing audio files or fonts not loading properly. It just works.
A Few Quick Settings for a Perfect Export
Once you decide to export, PowerPoint will ask you about quality. For most situations where you're sharing online, the "Internet Quality" or 720p resolution setting is your best bet. This gives you a crisp, clear video without creating a massive file that’s a pain to upload or download.
Creating high-quality narrated content is more important than ever. The voice-over market was already worth around USD 3.5 billion in 2023 and is expected to more than double in the next decade. That just goes to show how much demand there is for polished, professional presentations in e-learning, corporate training, and marketing. You can check out more stats on the voice-over market's growth here.
Taking a moment to pick the right export settings ensures your final presentation is professional and easy for everyone to access. And if you’ve used a tool like Speak4Me to generate your audio, exporting as a video locks in that high-quality narration for good.
Ready to create a flawless audio track for your next project? Download Speak4Me free on iOS and turn your script into professional narration in minutes.
Answering Your PowerPoint Voice Over Questions
Once you've recorded your narration, a few common hiccups can pop up. It's totally normal. Let's walk through some of the most frequent questions I hear and get them sorted out so you can finalize your presentation.
Can I Just Rerecord the Audio on a Single Slide?
Yes, you absolutely can, and it's a lifesaver. You don't have to start over from scratch if you flub a line or want to update a single point. PowerPoint is smart enough to handle audio on a slide-by-slide basis.
Simply navigate to the slide you want to fix. Head over to the "Record" tab, find the "Clear" button, and you'll see options to remove the narration and timings for just that slide. Once it's cleared, you can re-record that small section without affecting the rest of your hard work.
What’s the Best Audio Format to Use?
Stick with MP3. It’s the gold standard for a reason.
MP3 files give you that sweet spot of great audio quality without a massive file size. This is a big deal for keeping your presentation running smoothly, especially if you plan on sharing it. When you use a tool like Speak4Me, it automatically generates your voice-overs as high-quality MP3s, so you're already starting with the right format.
How Can I Make My Narrated PowerPoint File Smaller?
Huge file sizes are a classic problem, especially with audio on every slide. The good news is that PowerPoint has a built-in tool to fix this.
Go to File > Info > Compress Media. You’ll see a few options. For most situations, choosing a setting like "Internet Quality" does the trick. It slims down the file size significantly without making the audio sound terrible. If you're saving the whole thing as a video, dropping the resolution from 1080p to 720p will also make a massive difference.
Why Won’t My Audio Play on Other Computers?
Ah, the most frustrating problem of all. You send your masterpiece to a colleague, and they hear... silence. This almost always happens because your audio files were linked, not embedded. The presentation is looking for the audio files on your computer, which obviously doesn't work when it's on someone else's.
The most bulletproof solution is to export the entire presentation as a video (MP4). This process bakes everything—your audio, animations, and slide timings—into a single, self-contained file. It’s the surefire way to guarantee that what you see and hear is exactly what everyone else will, too.
Knowing how to troubleshoot these little issues is what turns a good narrated presentation into a great one.
If you want to skip the recording headaches altogether, let Speak4Me create consistently perfect narration for you. Download Speak4Me free on iOS and get studio-quality audio for your next project in minutes.
Try Speak4Me for Free
